
Blocky Character Concept: Plan Five Clear Color Regions
Plan a blocky character concept with five readable color regions, a simple prompt and checks for boundaries between clothing and accessories.
What's new on this page
- 2026-10-29 — Page published. Clarified the guide’s search focus, added a practical FAQ and replaced the embedded video with an image.
A blocky character concept reads more clearly when its main color regions are distinct. This guide uses a five-region courier brief to separate clothing, accessories and lighting before comparing a generated candidate.
A blocky character project begins with a design choice: which parts of the reference need to remain recognizable? A photograph contains lighting, texture and background detail that a small character design cannot preserve equally. This guide gives you a five-region color brief for deciding what to keep before making a blocky concept image.
The deliverable here is a character concept and a written handoff. If you plan to use it on a game model, prepare a separate texture that follows that model's layout and import requirements. A large character illustration cannot be assumed to be an import-ready texture.
Blocky character concept: build a color brief from visible regions
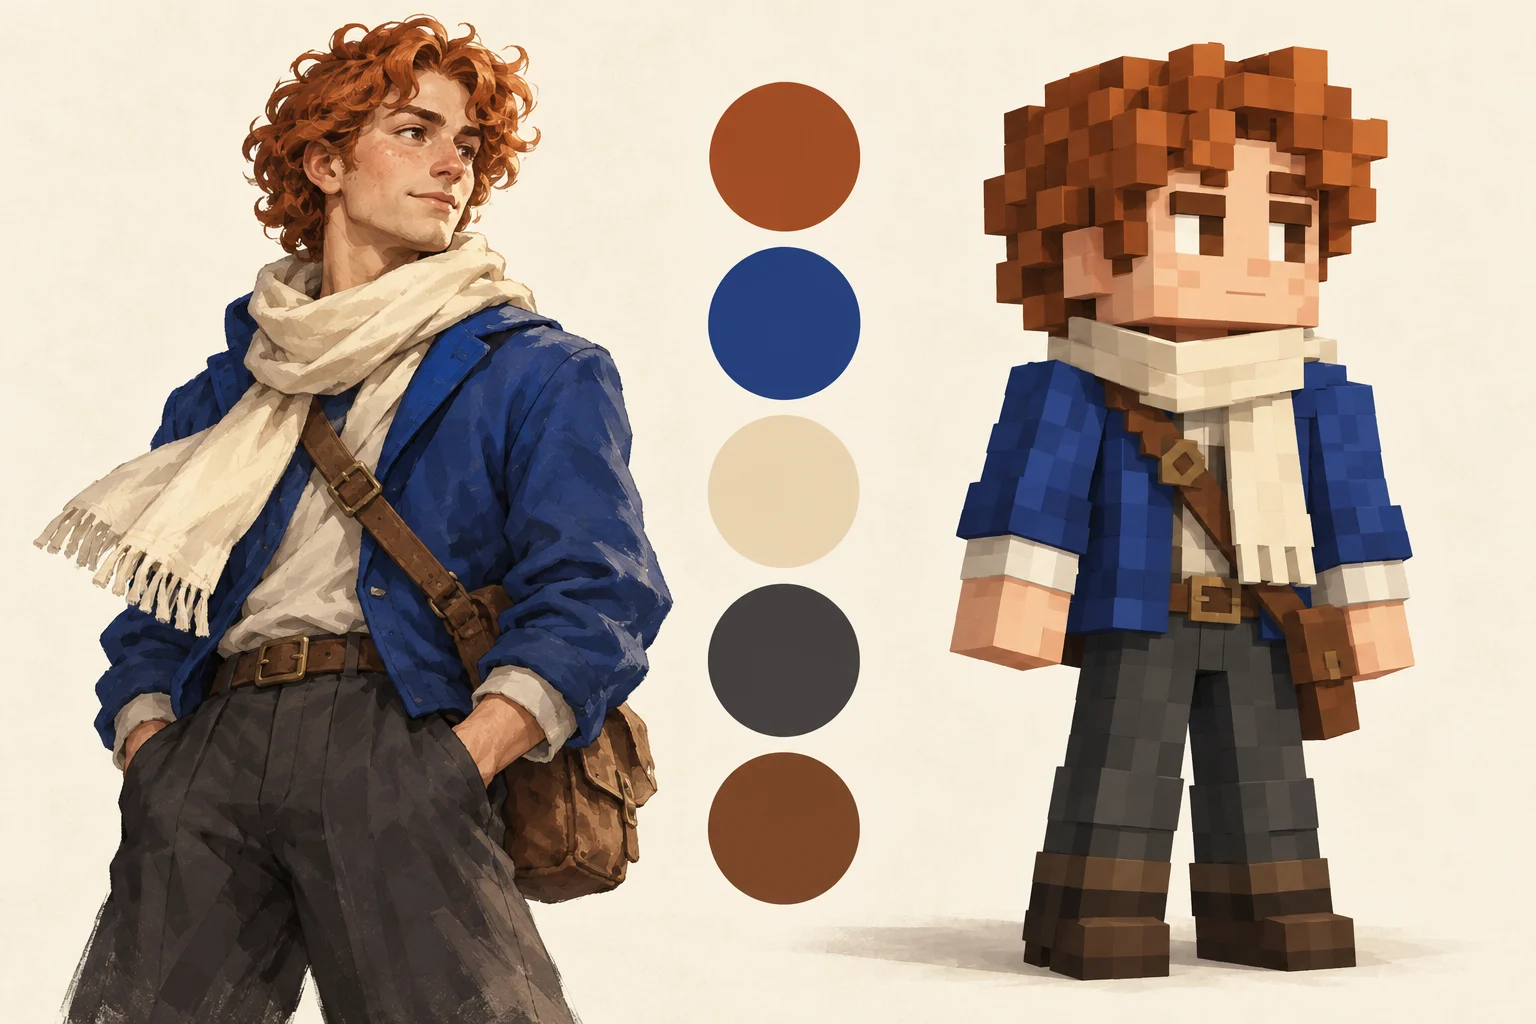
Use a fictional courier as the exercise: copper curls, a cobalt jacket, a cream scarf, charcoal trousers and a brown shoulder bag. These five regions give the character a recognizable arrangement before you add fine detail. The companion illustration explores that arrangement; it is concept artwork rather than a result from a tested skin converter.
Write a short color checklist before opening a generator:
-
Region: Hair; Keep: Copper color and broad curly outline; Simplify: Individual strands and reflected highlights
-
Region: Upper body; Keep: A large cobalt jacket area; Simplify: Small seams, folds and stitching
-
Region: Neck; Keep: A clear cream scarf band; Simplify: Fringe and fabric weave
-
Region: Lower body; Keep: Charcoal trousers separated from the jacket; Simplify: Subtle shading and pocket outlines
-
Region: Accessory; Keep: Brown strap crossing the torso; Simplify: Buckles too small to read at the destination size
This is a planning convention, not a five-color file limit. You may need more colors when drawing the final texture. The point is to establish which regions carry the identity and which details can change without losing the idea.
Separate color from lighting
A blue jacket photographed under warm lamps may contain orange highlights and nearly black shadows. Decide whether those tones describe the clothing or merely the lighting. If you sample every visible tone and give each one equal importance, the design can become a patchwork without a clear main color.
Look at the reference in several areas. Choose a representative jacket color, then record a lighter and darker supporting tone only if you need them. Keep the cream scarf distinct from the face and the brown strap distinct from the jacket. Those boundaries matter more to this exercise than matching every pixel of the source.
Avoid selecting a palette entirely from the background. A vivid wall can dominate a photograph while contributing nothing to the character. Crop or frame the reference so the subject's clothing and hair are easy to inspect, and keep an untouched original for comparison.
Use the brief in a concept request
Open the image workspace and inspect its current modes and model controls. If you select a reference-image mode, use a clear image that shows the features in the checklist. A text-based exploration can instead begin with the written character description. The active form determines which inputs are supported.
An original suggested prompt for the courier is:
Create a full-body blocky character concept of an adult courier. Preserve five main regions: copper curly hair, cobalt jacket, cream scarf, charcoal trousers and a brown shoulder strap. Use broad readable shapes and a neutral background. Keep the scarf separate from the face and the strap distinct from the jacket. Show a concept illustration, without interface elements, labels or lettering.
This prompt is a starting brief, not a claim of a tested output. Check the current quote before submitting. The pricing page describes purchase options; it does not replace the quote for the selected request.
Review boundaries before decorative detail
When you have a candidate image, look at it small. Can you still distinguish the hair, face, scarf and jacket? Then enlarge it and inspect where those regions meet. A cream scarf that merges into the face may need a clearer edge; extra folds elsewhere will not solve that specific problem.
Use three observations rather than a general score: the first feature you notice, the region that disappears, and the one change you want next. For example: “The jacket reads first; the strap disappears against its shadow; make the strap a simpler uninterrupted band.” That is an actionable revision to the brief.
Save the reference, prompt and chosen settings with each candidate. Change one important relationship at a time. A new pose, outfit and background may produce an attractive image, but it makes a controlled comparison harder.
Hand the concept to a texture workflow
Once the appearance is settled, use a skin editor that supports the intended character model and texture layout. The concept serves as a visual guide while you place the face, clothing and accessories on their actual body regions. Resizing the illustration does not perform that mapping.
Decide how the courier looks from behind. Continue the jacket deliberately and choose a consistent strap path. Check the shoulders, sides of the head and feet in a rotating preview. Mark any area that the original photo did not show as a design decision, rather than claiming that the image recovered hidden information.
Keep the finished concept separate from the exported texture. If you only need a profile image or mood board, the concept may be the final artifact. If you want an in-game skin, verify the exported file in the appropriate skin workflow before calling it ready. The useful result of this color exercise is a clear design brief that survives that handoff.
Frequently asked questions
How many colors should a blocky character concept use?
There is no required number. Begin with a small set of meaningful regions, check that adjacent parts remain distinct, and add supporting shades only when they serve the design.